02 First startup and configuration
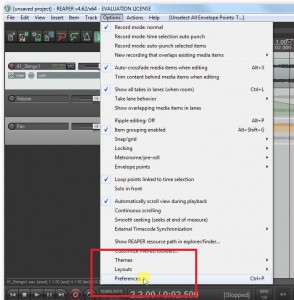
After launching the REAPER for the first time we will see its main screen. Before we start our fun/work with our freshly installed software I would suggest taking a short while to configure a few options – it will save us a lot of unnecessary frustration and maybe prevent us from “losing” saved projects or installed VSTs (these will be discussed shortly). We can access the configuration window by pressing Ctrl+P.
Before we go any further, a short notice on topic of hotkeys.
Many people use their DAW software and any other programs and do not take advantage of hotkeys at all. I do not claim that it is necessary for efficient work with the program, but skillful use of hotkeys might greatly increase the speed with which we work. To encourage you to try and use the hotkeys I will be providing shortcuts when possible with the addition of a picture showing how to do the particular action without them.
To go to the complete hotkey list press Shift+F1 on the main screen.
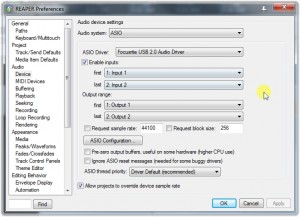
[Windows] After launching the Preferences window let us go to Audio -> Device. There we should choose our sound device that we will use to listen to and record music. If possible we choose the ASIO option and look for our interface or soundcard (if the drivers to our device are not installed we might try and use the ASIO4ALL drivers, available for free). More data on that topic is available on http://en.wikipedia.org/wiki/Audio_Stream_Input/Output. It is also worth changing the sample rate and block size to those of our device. If the values are not known to us trying 44100Hz sample rate and 512 buffer size might be a good guess/starting point.
[Mac OS X] Analogical to the Windows version, but we do not have to think about installing the drivers.
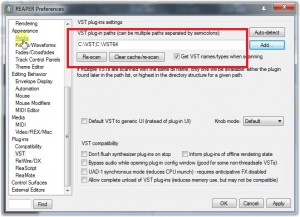
Next thing we should take care of is defining the paths to the VST folders. VST is an abbreviation of Virtual Studio Technology, which means an external software that we can launch inside of our DAW. This topic will be discussed in one of the later chapters, for now I would like to suggest creating, in an easily reachable location, for example on the C: drive, a new folder called VST and, if we’ve chosen a 64-bit version of the program, a folder called VST64. In the indicated window we put in the location/locations of our choice (divided with a ‘sign’), in my case it looks like this:
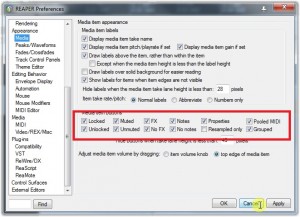
The last thing worth looking into before advancing is going to the menu called Appearance -> Media and choosing all the boxes except for ‘Resampled only’. It will make it easier for us to control individual objects within our mix, but as with the VST, I will discuss it in due time.


